Mes: mayo 2018
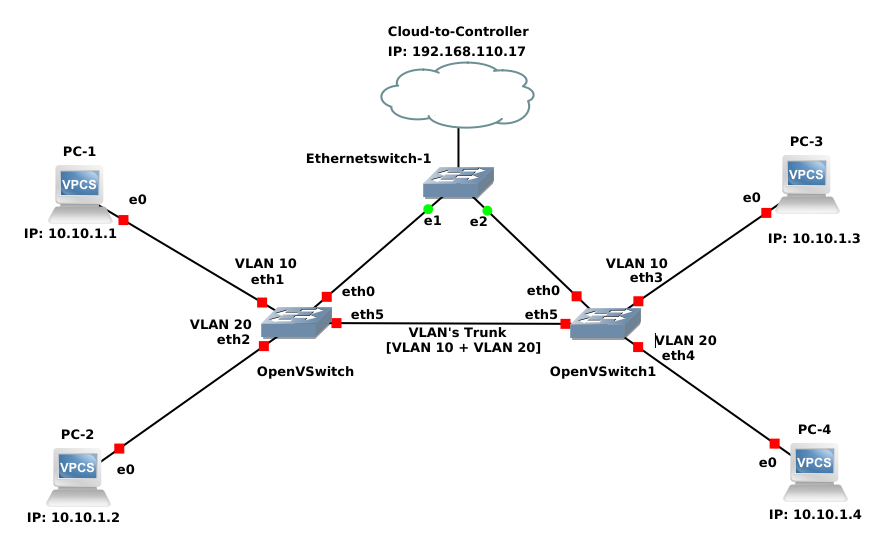
Actividad n° 8: Manejo de Trunk de VLANs sobre OpenWRT
1) Armar una topología similar a la que se muestra adjunta sobre entorno de simulación. Pueden usar Mininet y/o GNS3 para armar la topología. Les aconsejo correr el controlador en una máquina virtual, lo que les servirá tanto para el caso de Mininet como para el de GNS3. Pueden usar como controladores OpenDaylight y/o Ryu/Faucet.
2) Realizar pruebas de conectividad usando la herramienta “Ping” desde la PC1 hacia las demás. Verificar el comportamiento y anotar conclusiones.
3) Obtener la versión del OpenVSwitch que están utilizando y verificar si soporta Trunk de VLAN’s (Protocolo IEEE 802.1Q)
4) Buscar script y/o aplicación que corra sobre los controladores y permita trabajar sobre el switch con Trunk de VLAN’s.
5) Crear VLAN n° 10 y asignarla a los puertos de las PC1 y PC3. Crear VLAN n° 20 y asignarla a las PC2 y PC4.
6) Probar conectividad desde PC1 hacia las demás. Probar conectividad desde PC2 hacia las demás. Anotar conclusiones.
7) Replicar la topología simulada en hardware real. Utilizar los switches TP-Link con OpenWRT y el OpenVSwitch; previamente verificar que la versión compilada del OVS soporte VLAN’s.
8) Realizar posteos en la Web del CIDI con el avance de la actividad (al menos un posteo semanal, puede ser grupal ó individual — Por favor, titulen los posteos como ” Actividad n° 8 — XXXXXXXXX”, así podemos vincular los posteos a la actividad.
9) Armar un informe escrito en modo tutorial, incluyendo topologías, descripción de las pruebas / escenarios, capturas de pantalla, resultados y conclusiones.
Actividad 7 01: Open vSwitch en GNS3
Topología
GNS3
1- Agregamos una interface bridge en la vm de gns3.


En total quedan tres interfaces: Host-only, Nat, Bridged.
2- Agregamos un switch openvswitch management a la topología GNS3 desde la categoría switches.
3- Agregamos un nodo cloud y conectamos eth0 de openvswitch a eth2 del nodo cloud.
En Open vSwitch
1- Configuramos la interface eth0 con una ip de la red local ip addr add 192.168.1.120/24
2- Configuramos el datapath de br0 con el id:ovs-vsctl set bridge br0 other-config:datapath-id=0000000000000001
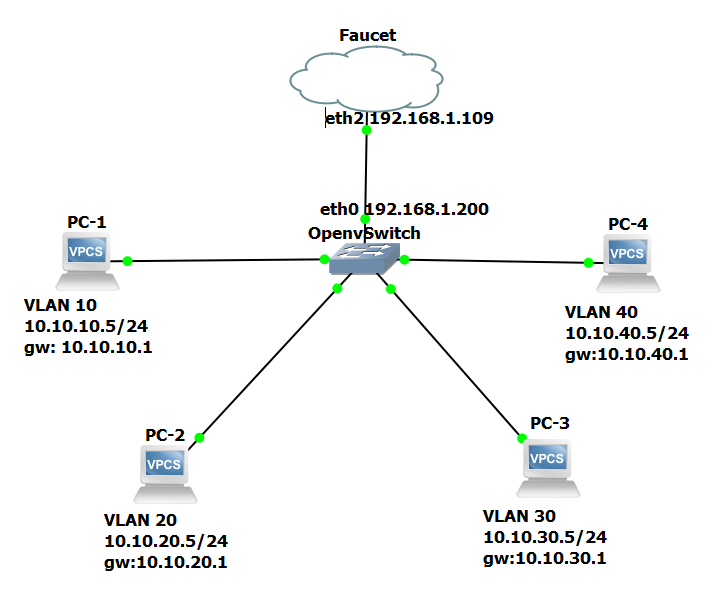
3- Configurar ip del controlador al cual se conecta ovs-vsctl set-controller br0 tcp:192.168.1.109:6653
4- Agregar nodo cloud y conectar eth0 de ovs a la tercera interfaz del nodo cloud (eth2)

En vm ubuntu:
Instalar Docker CE
sudo apt-get install \
    apt-transport-https \
    ca-certificates \
    curl \
    software-properties-common
curl -fsSL https://download.docker.com/linux/ubuntu/gpg | sudo apt-key add
sudo add-apt-repository \
   "deb [arch=amd64] https://download.docker.com/linux/ubuntu \
   $(lsb_release -cs) \
   stable"
sudo apt-get update
sudo apt-get install docker-ce
Instalación del contenedor faucet
# Crear archivos de configuración
sudo mkdir -p /etc/faucet
sudo touch /etc/faucet/faucet.yaml
sudo touch /etc/faucet/gauge.yaml

# Pull de imagen faucet
mkdir -p /var/log/faucet/
docker pull faucet/faucet:latest
Editar la configuración de faucet en /etc/faucet/facuet.yaml
dps:
    switch-1:
        dp_id: 0000000000000001
        timeout: 3600
        arp_neighbor_timeout: 3600
        interfaces:
            1:
                native_vlan: 10
            2:
                native_vlan: 20
            3:
                native_vlan: 30
            4:
                native_vlan: 40

vlans:
    10:
        faucet_vips: ["10.10.10.1/24"]
    20:
        faucet_vips: ["10.10.20.1/24"]
    30:
        faucet_vips: ["10.10.30.1/24"]
    40:
        faucet_vips: ["10.10.40.1/24"]
routers:
    router-1:
        vlans: [10, 20, 30, 40]
1- Iniciar Faucet
docker run -d \
    --name faucet \
    --restart=always \
    -v /etc/faucet/:/etc/faucet/ \
    -v /etc/ryu/ssl/:/etc/ryu/ssl/ \
    -v /var/log/faucet/:/var/log/faucet/ \
    -p 6653:6653 \
    faucet/faucet
2- Observamos en el log de faucet la configuración de 4 puertos y 4 vlans.
cat /var/log/faucet/faucet.log
pr 27 23:44:42 faucet.valve INFO     DPID 1 (0x1) Cold start configuring DP
Apr 27 23:44:42 faucet.valve INFO     DPID 1 (0x1) Configuring VLAN 10 vid:10 ports:Port 1
Apr 27 23:44:42 faucet.valve INFO     DPID 1 (0x1) Configuring VLAN 20 vid:20 ports:Port 2
Apr 27 23:44:42 faucet.valve INFO     DPID 1 (0x1) Configuring VLAN 30 vid:30 ports:Port 3
Apr 27 23:44:42 faucet.valve INFO     DPID 1 (0x1) Configuring VLAN 40 vid:40 ports:Port 4
Apr 27 23:44:42 faucet.valve INFO     DPID 1 (0x1) Port 1 configured
Apr 27 23:44:42 faucet.valve INFO     DPID 1 (0x1) Port 2 configured
Apr 27 23:44:42 faucet.valve INFO     DPID 1 (0x1) Port 3 configured
Apr 27 23:44:42 faucet.valve INFO     DPID 1 (0x1) Port 4 configured
Apr 27 23:44:42 faucet.valve INFO     DPID 1 (0x1) Ignoring port:5 not present in configuration file
Apr 27 23:44:42 faucet.valve INFO     DPID 1 (0x1) Ignoring port:6 not present in configuration file
Apr 27 23:44:42 faucet.valve INFO     DPID 1 (0x1) Ignoring port:7 not present in configuration file
Apr 27 23:44:42 faucet.valve INFO     DPID 1 (0x1) Ignoring port:8 not present in configuration file
Apr 27 23:44:42 faucet.valve INFO     DPID 1 (0x1) Ignoring port:9 not present in configuration file
Apr 27 23:44:42 faucet.valve INFO     DPID 1 (0x1) Ignoring port:10 not present in configuration file
Apr 27 23:44:42 faucet.valve INFO     DPID 1 (0x1) Ignoring port:11 not present in configuration file
Apr 27 23:44:42 faucet.valve INFO     DPID 1 (0x1) Ignoring port:12 not present in configuration file
Apr 27 23:44:42 faucet.valve INFO     DPID 1 (0x1) Ignoring port:13 not present in configuration file
Apr 27 23:44:42 faucet.valve INFO     DPID 1 (0x1) Ignoring port:14 not present in configuration file
Apr 27 23:44:42 faucet.valve INFO     DPID 1 (0x1) Ignoring port:15 not present in configuration file
Apr 27 23:44:42 faucet.valve INFO     DPID 1 (0x1) Ignoring port:4294967294 not present in configuration file
Ubuntu y Faucet en contenedor docker
En este caso corremos el controlador sobre ubuntu desde un contenedor docker
Podemos construir la imagen a partir de un Dockerfile o descargarla desde un repositorio público.
Para construir la imagen:
Creamos una carpeta de trabajo con cualquier nombremkdir docker && cd docker
Crear un dockerfile para construir la imagen.
FROM ubuntu:16.04
RUN apt-get update && apt-get install -y iputils-ping iproute2 curl gnupg apt-transport-https lsb-release
RUN echo "deb https://packagecloud.io/faucetsdn/faucet/$(lsb_release -si | awk '{print tolower($0)}')/ $(lsb_release -sc) main" | tee /etc/apt/sources.list.d/faucet.list
RUN curl -L https://packagecloud.io/faucetsdn/faucet/gpgkey | apt-key add -
RUN apt-get update && apt-get install -y faucet-all-in-one
Correr build con docker docker build -t ${USER}/faucet .
Para descargar la imagen desde dockerhub
docker pull nico1989/faucet_ubuntu
Ahora en gns3 podemos agregar el contenedor de ubuntu con faucet ya instalado y usarlo como controlador
Configuración de contenedor faucet
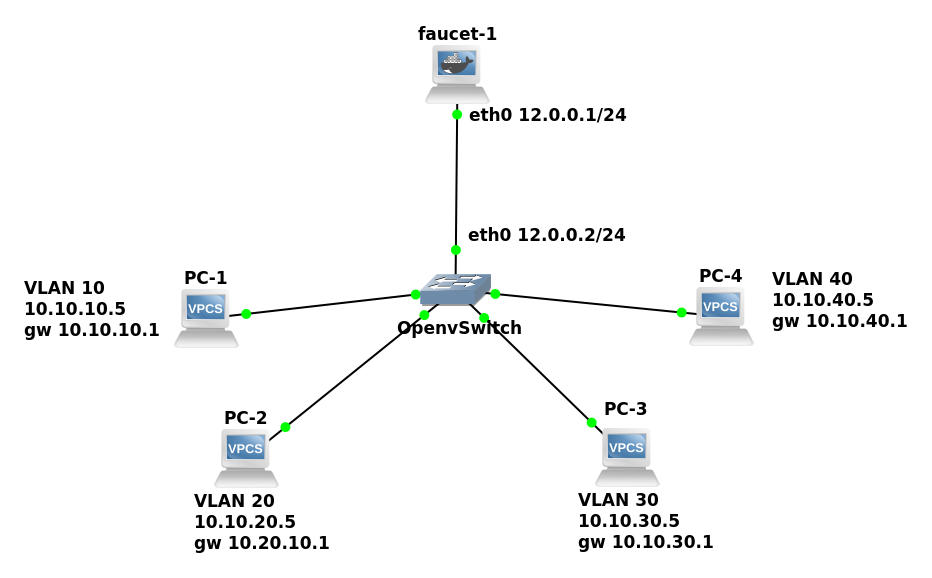
Configuramos la direccion ip 12.0.0.1/24 en eth0
#
# This is a sample network config uncomment lines to configure the network
#


# Static config for eth0
auto eth0
iface eth0 inet static
    address 12.0.0.1/24
    netmask 255.255.255.0
    gateway 192.168.0.1
    up echo nameserver 192.168.0.1 > /etc/resolv.conf

# DHCP config for eth0
# auto eth0
# iface eth0 inet dhcp
Editamos el archivo de configuración
cat << 'EOF' > /etc/faucet/faucet.yaml
dps:
    switch-1:
        dp_id: 0000000000000001
        timeout: 3600
        arp_neighbor_timeout: 3600
        interfaces:
            1:
                native_vlan: 10
            2:
                native_vlan: 20
            3:
                native_vlan: 30
            4:
                native_vlan: 40

vlans:
    10:
        faucet_vips: ["10.10.10.1/24"]
    20:
        faucet_vips: ["10.10.20.1/24"]
    30:
        faucet_vips: ["10.10.30.1/24"]
    40:
        faucet_vips: ["10.10.40.1/24"]
routers:
    router-1:
        vlans: [10, 20, 30, 40]
EOF
Configuración de Open vSwitch
configuramos la ip 12.0.0.2/24 en eth0 y el controlador 12.0.0.1/24 con datapath 01.
ip a a 12.0.0.2/24 dev eth0
ovs-vsctl set bridge br0 other-config:datapath-id=0000000000000001
ovs-vsctl set-controller br0 tcp:12.0.0.1:6653
Analisis de flujos
Volcamos los flujos a un archivo para despues compararlos
ovs-ofctl dump-flows br0 | cut -d , -f 3,7- > flujos_sin_ruteoAgregamos ruteo a la configuracion de faucet y reiniciamos el controlador. Volcamos la configuracion a otro archivo
ovs-ofctl dump-flows br1 | cut -d , -f 3,7- > flujos_con_ruteoComparación de flujos
TABLA 3
Observamos los flujos agregados para manejar paquetes ARP y los paquetes dirigidos a la MAC router (0e:00:00:00:00:01)
Al habilitar el ruteo entre VLANS se agregan los flujos que manejan los paquetes arp en las distintas VLANS.
/ # diff flujos_sin_ruteo flujos_con_ruteo | grep table=3
+ table=3, priority=9131,arp,dl_vlan=40 actions=resubmit(,6)
+ table=3, priority=9131,arp,dl_vlan=10 actions=resubmit(,6)
+ table=3, priority=9131,arp,dl_vlan=20 actions=resubmit(,6)
+ table=3, priority=9131,arp,dl_vlan=30 actions=resubmit(,6)
  table=3, priority=9099,dl_src=ff:ff:ff:ff:ff:ff actions=drop
  table=3, priority=9001,dl_src=0e:00:00:00:00:01 actions=drop
+ table=3, priority=9099,ip,dl_vlan=40,dl_dst=0e:00:00:00:00:01 actions=resubmit(,4)
+ table=3, priority=9099,ip,dl_vlan=10,dl_dst=0e:00:00:00:00:01 actions=resubmit(,4)
+ table=3, priority=9099,ip,dl_vlan=20,dl_dst=0e:00:00:00:00:01 actions=resubmit(,4)
+ table=3, priority=9099,ip,dl_vlan=30,dl_dst=0e:00:00:00:00:01 actions=resubmit(,4)
  table=3, priority=0 actions=drop
  table=3, priority=9000 actions=CONTROLLER:96,resubmit(,7)
TABLA 4
Esta tabla contiene la información de forwarding para los paquetes ip.
  / # diff flujos_sin_ruteo flujos_con_ruteo | grep table=4
  + table=4, priority=9131,ip,dl_vlan=40,nw_dst=10.10.40.1 actions=resubmit(,6)
  + table=4, priority=9131,ip,dl_vlan=10,nw_dst=10.10.10.1 actions=resubmit(,6)
  + table=4, priority=9131,ip,dl_vlan=20,nw_dst=10.10.20.1 actions=resubmit(,6)
  + table=4, priority=9131,ip,dl_vlan=30,nw_dst=10.10.30.1 actions=resubmit(,6)
  + table=4, priority=9123,ip,dl_vlan=30,nw_dst=10.10.40.0/24 actions=resubmit(,6)
  + table=4, priority=9123,ip,dl_vlan=20,nw_dst=10.10.40.0/24 actions=resubmit(,6)
  + table=4, priority=9123,ip,dl_vlan=40,nw_dst=10.10.40.0/24 actions=resubmit(,6)
  + table=4, priority=9123,ip,dl_vlan=10,nw_dst=10.10.40.0/24 actions=resubmit(,6)
  + table=4, priority=9123,ip,dl_vlan=30,nw_dst=10.10.10.0/24 actions=resubmit(,6)
  + table=4, priority=9123,ip,dl_vlan=20,nw_dst=10.10.10.0/24 actions=resubmit(,6)
  + table=4, priority=9123,ip,dl_vlan=40,nw_dst=10.10.10.0/24 actions=resubmit(,6)
  + table=4, priority=9123,ip,dl_vlan=10,nw_dst=10.10.10.0/24 actions=resubmit(,6)
  + table=4, priority=9123,ip,dl_vlan=30,nw_dst=10.10.20.0/24 actions=resubmit(,6)
  + table=4, priority=9123,ip,dl_vlan=20,nw_dst=10.10.20.0/24 actions=resubmit(,6)
  + table=4, priority=9123,ip,dl_vlan=40,nw_dst=10.10.20.0/24 actions=resubmit(,6)
  + table=4, priority=9123,ip,dl_vlan=10,nw_dst=10.10.20.0/24 actions=resubmit(,6)
  + table=4, priority=9123,ip,dl_vlan=30,nw_dst=10.10.30.0/24 actions=resubmit(,6)
  + table=4, priority=9123,ip,dl_vlan=20,nw_dst=10.10.30.0/24 actions=resubmit(,6)
  + table=4, priority=9123,ip,dl_vlan=40,nw_dst=10.10.30.0/24 actions=resubmit(,6)
  + table=4, priority=9123,ip,dl_vlan=10,nw_dst=10.10.30.0/24 actions=resubmit(,6)
    table=4, priority=0 actions=drop
TABLA 6
Esta tabla se encarga de enviar los paquetes ARP al controlador
/ # diff flujos_sin_ruteo flujos_con_ruteo | grep table=6
+ table=6, priority=9133,arp,arp_tpa=10.10.40.1 actions=CONTROLLER:128
+ table=6, priority=9133,arp,arp_tpa=10.10.10.1 actions=CONTROLLER:128
+ table=6, priority=9133,arp,arp_tpa=10.10.20.1 actions=CONTROLLER:128
+ table=6, priority=9133,arp,arp_tpa=10.10.30.1 actions=CONTROLLER:128
+ table=6, priority=9132,arp,dl_dst=ff:ff:ff:ff:ff:ff actions=resubmit(,8)
+ table=6, priority=9131,arp actions=resubmit(,7)
+ table=6, priority=9130,ip actions=CONTROLLER:128
  table=6, priority=0 actions=drop
Pruebas de conexión
Hacemos ping de la pc1 a la pc2 y observamos los flujos agregaados por el controlador para lograr el ruteo
/ # diff flujos_con_ruteo_B flujos_con_ruteo_C
--- flujos_con_ruteo_B
+++ flujos_con_ruteo_C
@@ -23,7 +23,9 @@
  table=3, priority=9099,ip,dl_vlan=10,dl_dst=0e:00:00:00:00:01 actions=resubmit(,4)
  table=3, priority=9099,ip,dl_vlan=20,dl_dst=0e:00:00:00:00:01 actions=resubmit(,4)
  table=3, priority=9099,ip,dl_vlan=30,dl_dst=0e:00:00:00:00:01 actions=resubmit(,4)
+ table=3, idle_age=260, priority=9098,in_port=1,dl_vlan=10,dl_src=00:50:79:66:68:05 actions=resubmit(,7)
+ table=3, idle_age=666, priority=9098,in_port=1,dl_vlan=10,dl_src=00:50:79:66:68:00 actions=resubmit(,7)
+ table=3, idle_age=114, priority=9098,in_port=2,dl_vlan=20,dl_src=00:50:79:66:68:01 actions=resubmit(,7)
  table=3, priority=0 actions=drop
  table=3, priority=9000 actions=CONTROLLER:96,resubmit(,7)
  table=4, priority=9131,ip,dl_vlan=40,nw_dst=10.10.40.1 actions=resubmit(,6)
@@ -34,6 +36,10 @@
  table=4, priority=9131,ip,dl_vlan=20,nw_dst=10.10.10.5 actions=mod_vlan_vid:10,mod_dl_src:0e:00:00:00:00:01,mod_dl_dst:00:50:79:66:68:00,dec_ttl,resubmit(,7)
  table=4, priority=9131,ip,dl_vlan=40,nw_dst=10.10.10.5 actions=mod_vlan_vid:10,mod_dl_src:0ie:00:00:00:00:01,mod_dl_dst:00:50:79:66:68:00,dec_ttl,resubmit(,7)
  table=4, priority=9131,ip,dl_vlan=10,nw_dst=10.10.10.5 actions=mod_vlan_vid:10,mod_dl_src:0e:00:00:00:00:01,mod_dl_dst:00:50:79:66:68:00,dec_ttl,resubmit(,7)
+ table=4, priority=9131,ip,dl_vlan=30,nw_dst=10.10.20.5 actions=mod_vlan_vid:20,mod_dl_src:0e:00:00:00:00:01,mod_dl_dst:00:50:79:66:68:01,dec_ttl,resubmit(,7)
+ table=4, priority=9131,ip,dl_vlan=20,nw_dst=10.10.20.5 actions=mod_vlan_vid:20,mod_dl_src:0e:00:00:00:00:01,mod_dl_dst:00:50:79:66:68:01,dec_ttl,resubmit(,7)
+ table=4, priority=9131,ip,dl_vlan=40,nw_dst=10.10.20.5 actions=mod_vlan_vid:20,mod_dl_src:0e:00:00:00:00:01,mod_dl_dst:00:50:79:66:68:01,dec_ttl,resubmit(,7)
+ table=4, priority=9131,ip,dl_vlan=10,nw_dst=10.10.20.5 actions=mod_vlan_vid:20,mod_dl_src:0e:00:00:00:00:01,mod_dl_dst:00:50:79:66:68:01,dec_ttl,resubmit(,7)
  table=4, priority=9123,ip,dl_vlan=30,nw_dst=10.10.40.0/24 actions=resubmit(,6)
  table=4, priority=9123,ip,dl_vlan=20,nw_dst=10.10.40.0/24 actions=resubmit(,6)
  table=4, priority=9123,ip,dl_vlan=40,nw_dst=10.10.40.0/24 actions=resubmit(,6)
@@ -60,7 +66,9 @@
  table=6, priority=9131,arp actions=resubmit(,7)
  table=6, priority=9130,ip actions=CONTROLLER:128
  table=6, priority=0 actions=drop
+ table=7, idle_age=27, priority=9099,dl_vlan=10,dl_dst=00:50:79:66:68:00 actions=strip_vlan,output:1
+ table=7, idle_age=27, priority=9099,dl_vlan=20,dl_dst=00:50:79:66:68:01 actions=strip_vlan,output:2
  table=7, priority=0 actions=drop
  table=7, priority=9000 actions=resubmit(,8)
  table=8, priority=9004,dl_vlan=40,dl_dst=ff:ff:ff:ff:ff:ff actions=strip_vlan,output:4
Tabla 4: observamos las asociaciones ip-MAC aprendidas por el controlador, modifica la etiqueta de vlan, modifica la MAC de origen y la reemplaza por la mac de router (00:00:00:00:00:01), modifica la MAC destino, reenvía a la tabla 7.
La tabla 7 se encarga de hacer el forwarding a nivel de enlace a los puertos que correspondan.
Resolver problema DNS en Docker
Docker usa por defecto los DNS públicos de Google (8.8.8.8). Si este DNS está bloqueado dentro de la red donde estamos trabajando los contenedores no pueden resolver direcciones.
Buscamos los dns impuestos por la red:
$ nmcli dev show | grep 'IP4.DNS'
IP4.DNS[1]:                             10.1.70.2
IP4.DNS[2]:                             10.1.70.3
Buscamos los dns impuestos por la red:
$ nmcli dev show | grep 'IP4.DNS'
IP4.DNS[1]: 10.1.70.2
IP4.DNS[2]: 10.1.70.3Creamos un archivo de configuración del daemon docker en /etc/docker/daemon.json con los dns que estamos usando.
{
  "dns": ["10.1.70.2", "10.1.70.3"]
}